Educational disclaimer. This is a hands-on starter tutorial in quantum computing, meant for learning. The circuit is the smallest interesting one there is, and the platform tour around it is deliberately shallow. Backend counts, marketplace counts and measurement integers are snapshots from the day this was written, and they will drift. Treat the live pages and the API references as the single source of truth.
1. Build
Turn two independent coin flips into one entangled pair.
2. Run it
Transpile and submit to kipu.sim.qsim, the free Kipu simulator, to run the experiment.
3. Kipu stack
Where this tutorial lives on the hardware layer, and how to find your job in the dashboard.
Wondering what superposition and entanglement actually are, or why quantum is having its moment? Read the primer first, then come back.
Every task below carries collapsed hints: Hint 1 tells you where you could look, Hint 2 gives additional pieces of the answer, and Step 6 has only the one tier. Think first, and try before revealing the solution.
Step 0: Set up the environment
To run your first quantum program, you need a Python project folder with the Hub SDK, and your personal access token.
Build from scratch with uv, qhub-quantum and qhubctl
We teach this approach with uv, use your favorite Python package manager at your own discretion. Either way, the code requires Python 3.11 or newer.
uv init kipu-hub-academy
cd kipu-hub-academy
uv venv
uv add qhub-quantum
You will also want the CLI (optional, recommended), which is a robust authorization route for your code. It ships on npm and needs Node.js 20 or higher:
npm install -g @quantum-hub/qhubctl
After completion
qhub-quantum brings Qiskit (the most popular and widely adopted programming SDK for quantum) with it, and does not require a separate install. To run your qhub python scripts you can now use:
uv run python example.py
Step 1: Connect
On Kipu's Quantum Hub, you authenticate with a personal access token. Think of them as unique identifiers to authorize actions inside your profile and organizations you are part of. Keep it safe like you would protect a password.
Navigation: You can find it on the home page to copy and regenerate if you suspect your secrets have been leaked. To generate and manage additional, context-specific and time-limited access tokens use the options in your profile settings.
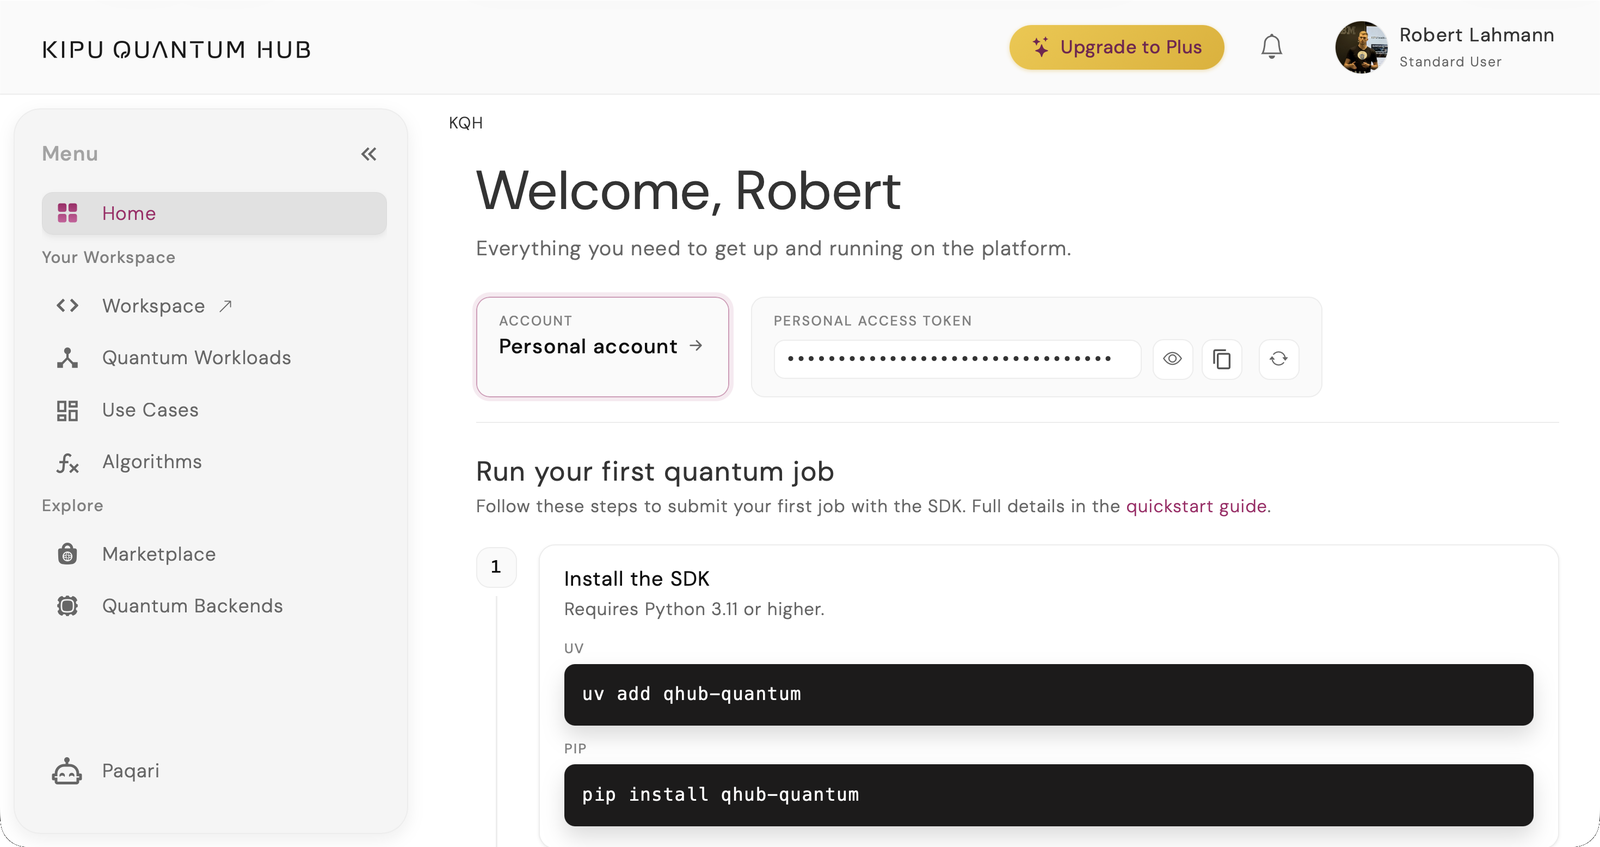
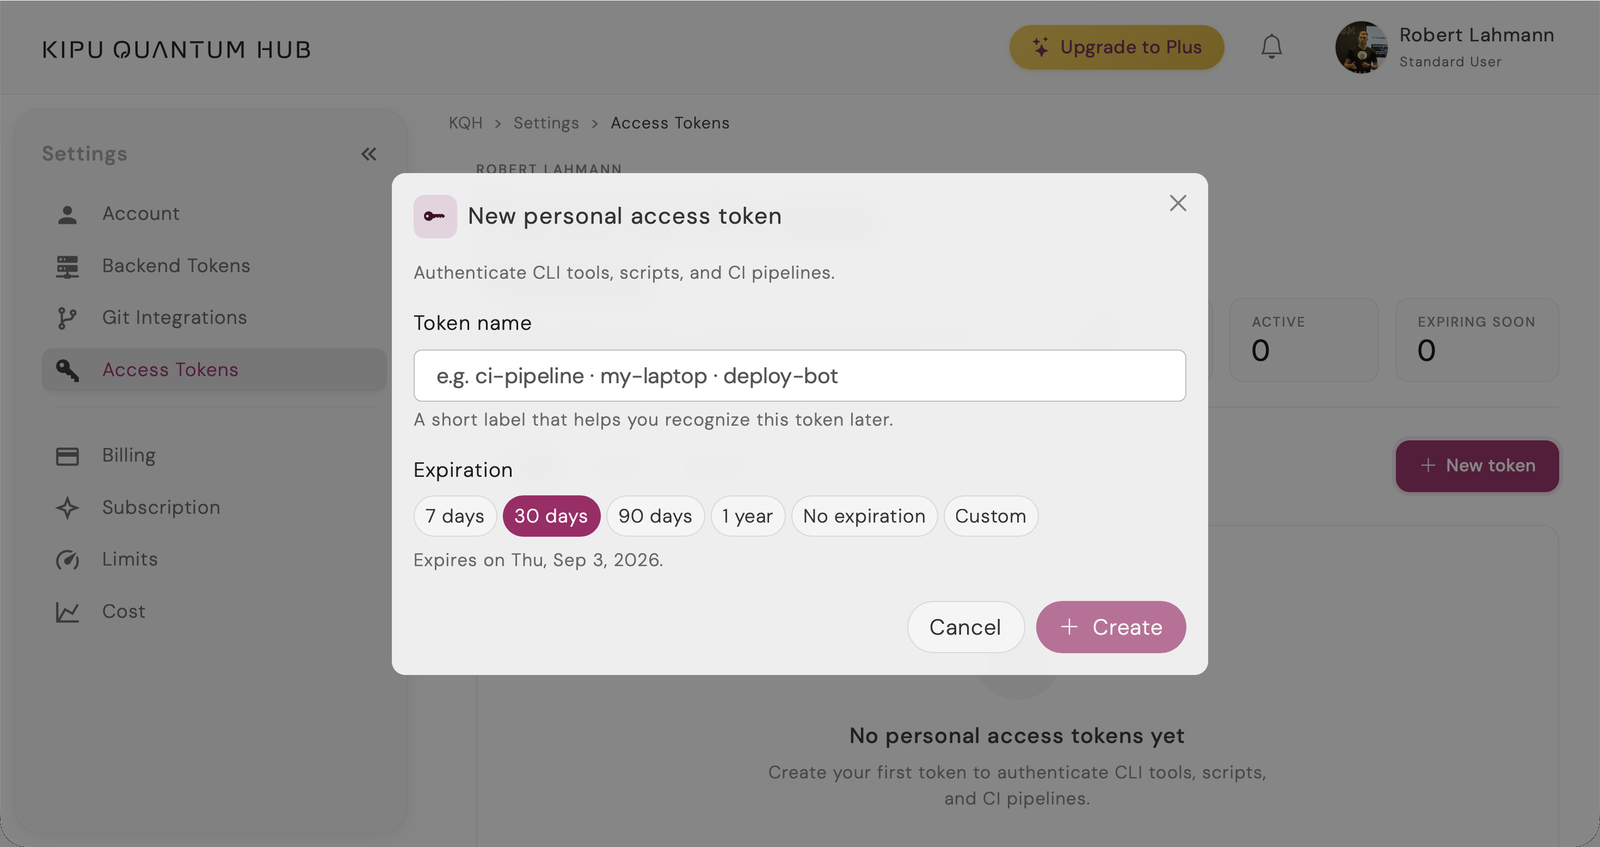
Reference: Manage access tokens.
How do I authenticate with my token?
To authenticate, the qhub-SDK provides three options.
- CLI login (recommended). Run
qhubctl login -t <your access token>. That writes~/.config/qhubctl/config.json, where the SDK reads it. - Environment variable. Export
KQH_PERSONAL_ACCESS_TOKEN=<your access token>in the environment you run the tasks from. Make sure to exclude it from uploading to git or docker containers (developer option). - Plain text in code, some objects allow you to pass your access_token directly inline. This risks exposure and leaks to third parties. Be extra careful and rotate your token frequently.
Task 1. Connect to a Hub backend with your personal access token.
- Write it as
task1_connect.py. - Print the backend name.
Hint 1, where to look
The provider object lives in qhub.quantum.sdk, and the Quickstart shows it in use. Ask for the free kipu.sim.qsim backend to prove the connection.
Hint 2, what to test
Reread Quickstart (Coin Toss). Declare provider = … and backend = … with the matching qhub.quantum.sdk import; skip the circuit construction and the run.
Solution
# task1_connect.py
from qhub.quantum.sdk import HubQiskitProvider

try:
    provider = HubQiskitProvider()
    check = provider.get_backend('kipu.sim.qsim')
    print(f'Connected. You are connected to {check.name}.')
except Exception as e:
    print(f'Connection failed: {e}\n')
    print('There are multiple options to complete this task:')
    print('  Route 1 (CLI, recommended): qhubctl login -t <your access token>')
    print('  Route 2 (ENV): export KQH_PERSONAL_ACCESS_TOKEN=<your access token> and set HubQiskitProvider(access_token=os.getenv("KQH_PERSONAL_ACCESS_TOKEN"))')
    print('  Route 3 (CODE): declare HubQiskitProvider(access_token=<your access token>) explicitly in the code. Take extra precautions and replace your token after exposing it.')
uv run python task1_connect.py
# Connected. You are connected to kipu.sim.qsim.
Step 2: The hardware layer
The ground layer of the Hub is hardware: QPUs and simulators from several vendors, all reachable with your credentials.
provider.backends()returns the backend ids, as strings in a list.provider.backends(detailed=True)returns backends with their specifications.
Check the Backend Documentation for a full reference.
Task 2. Print how many backends the SDK offers you, then print each simulator's id and qubit count.
- Print how many backends the SDK offers you.
- Print each simulator's id and qubit count. Work from the detailed listing, not the id-only one.
- Write both halves into
task2_backends.py.
Hint 1, where to look
provider.backends() returns ids, provider.backends(detailed=True) returns objects with their specifications, and the field names are in the Backend Documentation.
Hint 2, which patterns to use
You want id, type and configuration.qubit_count. A type is one of QPU, SIMULATOR, ANNEALER or UNKNOWN. To read every field off a backend rather than going by memory:
print(sorted(t for t in dir(detailed[0]) if not t.startswith('_')))
print(sorted(c for c in dir(detailed[0].configuration) if not c.startswith('_')))
Solution
# task2_backends.py
from qhub.quantum.sdk import HubQiskitProvider

provider = HubQiskitProvider()

detailed = provider.backends(detailed=True)
print(f'Backends the qhub-SDK offers: {len(detailed)}')

simulators = list(b for b in detailed if b.type == 'SIMULATOR')

print(f'\nSimulators ({len(simulators)} of {len(detailed)}):')
for b in simulators:
    print(f'  {b.id:<24} {b.configuration.qubit_count} qubits')
Backends the qhub-SDK offers: 22

Simulators (6 of 22):
  aws.sim.dm1              17 qubits
  aws.sim.sv1              34 qubits
  azure.ionq.simulator     29 qubits
  kipu.sim.qsim            30 qubits
  quandela.sim.belenos     12 qubits
  qudora.sim.xg1           32 qubits

# -> your count may differ: the catalogue grows, and access is per account. (Tutorial updated on Aug-04 2026)
The identifier is b.id. b.display_name holds the human label ("Kipu QSim Simulator") you might know from the backend page on Kipu's Quantum Hub. The specifications live under b.configuration, which also carries connectivity, gates, shots_range and supported_input_formats, all worth a look once you start choosing hardware for quantum-centric applications.
That printout is a snapshot: 22 backends, 16 QPUs and 6 simulators, counted on 4 August 2026 when this step was last run, and still 22 backends when the Hub catalogue was rechecked live on 24 August 2026. Of those 22, the 16 QPUs come from 7 vendors, and 20 of the 22 are reachable from the SDK, so a printout filtered to the SDK shows 20 rather than 22. Hub / Quantum-Backends carries the live list with the same IDs, and your own count will differ, because the catalogue grows and access is granted per account. Access to Kipu quantum simulator kipu.sim.qsim and Azure IonQ Simulator azure.ionq.simulator is free of charge. Other backends/devices require an account with active payment information.
You can check for details under Pricing. For information about the full service offering and Enterprise accounts, contact sales@kipu-quantum.com.
Step 3: From coin flip to entanglement
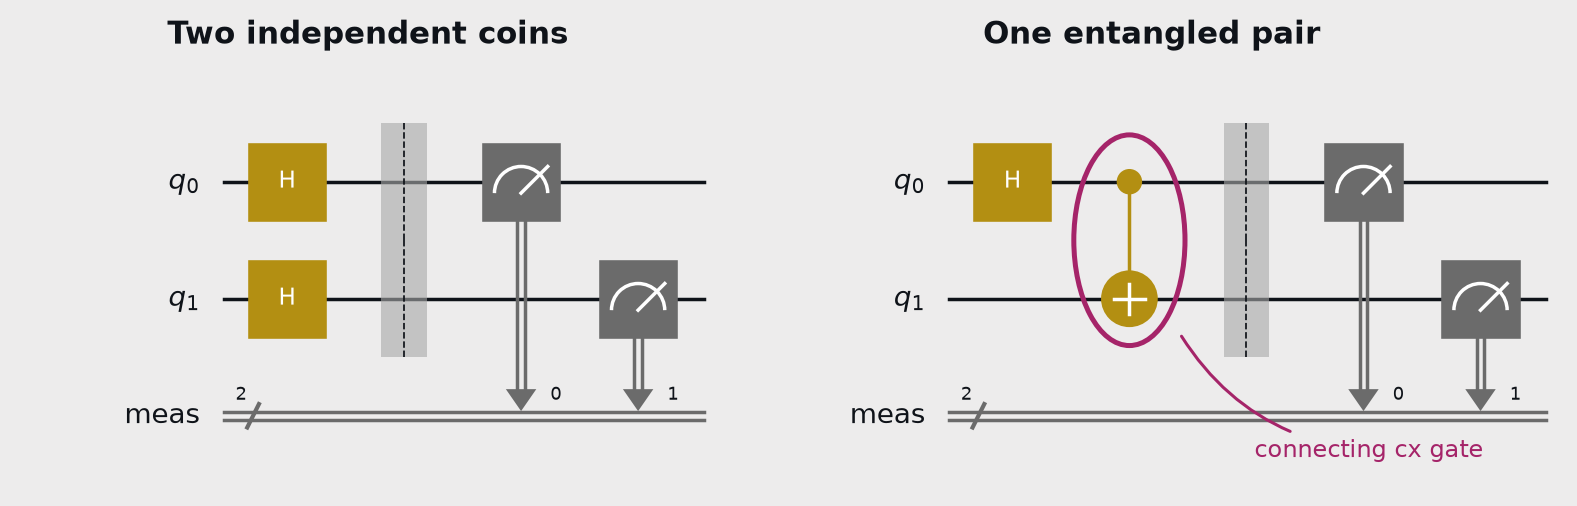
Think back to the Quickstart coin toss circuit. A Hadamard operation on each qubit, then measure all. For two coins, both qubit measurements are independent of each other, because nothing in that circuit connects them. With 50-50 probability each for 0 (heads) and 1 (tails), there exist four outcomes, 00, 01, 10 and 11, with equal probability of 25% each.
You enter a bet with a rich consul, that you find to be a suspicious quantum wizard. He suggests both of you bet a gold coin on the outcome of a coin flip. If both coins land on the same symbol, you get to keep it, if they disagree, you concede your coin. A seemingly fair game. Would you take that bet?
Before you answer, you are presented with the ability to think and run quantum experiments.
3a. Build the circuit
Task 3. Build a two-qubit circuit and print its diagram.
- Put qubit 0 in superposition with a Hadamard (
h) gate. - Apply a controlled-X (
cx) gate controlled by qubit 0, targeting qubit 1. - Add
measure_all, thenprint(circuit.draw()). - Write it as
task3_circuit.py.
Hint 1, where to look
Look among the controlled gates in Qiskit's QuantumCircuit API reference. QuantumCircuit(2) gives you the two-qubit setup.
Hint 2, the shape of the answer
circuit.h(0) puts qubit 0 into an equal superposition, a fair coin. cx takes the control qubit first and the target second. Without measure_all() the circuit transpiles and submits, then fails at the backend.
circuit = QuantumCircuit(2)
circuit.cx(control, target)
Solution
# task3_circuit.py
from qiskit import QuantumCircuit

circuit = QuantumCircuit(2)

circuit.h(0)
circuit.cx(0,1)
circuit.measure_all()

print(circuit.draw())
        ┌───┐      ░ ┌─┐
   q_0: ┤ H ├──■───░─┤M├───
        └───┘┌─┴─┐ ░ └╥┘┌─┐
   q_1: ─────┤ X ├─░──╫─┤M├
             └───┘ ░  ║ └╥┘
meas: 2/══════════════╩══╩═
You just applied a controlled-NOT! It flips the target exactly when the control is 1, which on classical input is an ordinary if-statement. Here the control is in superposition, so the rule applies to both branches at once: where qubit 0 is 0 the target stays 0, giving 00, and where it is 1 the target flips, giving 11. Neither qubit has a decided value yet; what the state fixes is that the two will match. As the purest form of combining superposition and entanglement we call it the Bell state. A similar classical circuit must read the control bit before deciding to flip the target. The cx gate never reads anything; it acts on both branches of the superposition and eliminates some outcomes, very similar to destructive interference in waves. To investigate this state further you would need a Bell test; check IBM's comprehensive tutorial for more.
3b. Stop and reflect, what do you expect to happen?
What do you expect to measure when running the circuit?
Your coin flip gave four outcomes at roughly a quarter each. With the circuit you just built, which states of 00, 01, 10 and 11 do you expect to survive, and with what probability? Write it down, or discuss with a partner. Check it after the experiment.
Step 4: Run the experiment
transpile(circuit, backend) rewrites your circuit into instructions the target hardware chip can actually use. Each chip can use different gate sets and has a different qubit layout. This is an essential translation step.
Pin the backend to kipu.sim.qsim as introduced in Step 2. It is one of the free simulators on Kipu's Quantum Hub.
4a. Transpile, submit, read the counts
Task 4. Run your circuit on kipu.sim.qsim and print the counts.
- Transpile it for that backend before submitting.
- Submit 1024 shots and print the job id.
- Wait for the job to reach a final state before reading the results.
- Write it as
task4_run.py.
Hint 1, where to look
The Quickstart shows the transpile and readout calls, and Job Documentation lists every property of the job object.
Hint 2, the shape of the answer
job.id holds the job ID, so print it and you can find the job later. job.result() hands you a stock Qiskit result object, so the measurements come from job.result().get_counts(). Submission is asynchronous: results exist only once the job reaches a final state.
Solution
# task4_run.py
from qhub.quantum.sdk import HubQiskitProvider
from qiskit import QuantumCircuit, transpile

BACKEND_ID = 'kipu.sim.qsim'   # free for testing
SHOTS = 1024

circuit = QuantumCircuit(2)
circuit.h(0)
circuit.cx(0, 1)
circuit.measure_all()

# Guard, not a formality. Without measurements this transpiles and submits fine, then
# fails on the backend, and the error surfaces at the readout where it looks unrelated.
if 'measure' not in circuit.count_ops():
    raise RuntimeError('This circuit has no measurements, so there is nothing to sample.')

provider = HubQiskitProvider()
backend = provider.get_backend(BACKEND_ID)
transpiled = transpile(circuit, backend)

job = backend.run(transpiled, shots=SHOTS)
print(f'Submitted to {BACKEND_ID}, {SHOTS} shots.')
print(f'Job id: {job.id}')
print(f'Status: {job.status()}')

job.wait_for_final_state()
result = job.result()
print(result.get_counts())
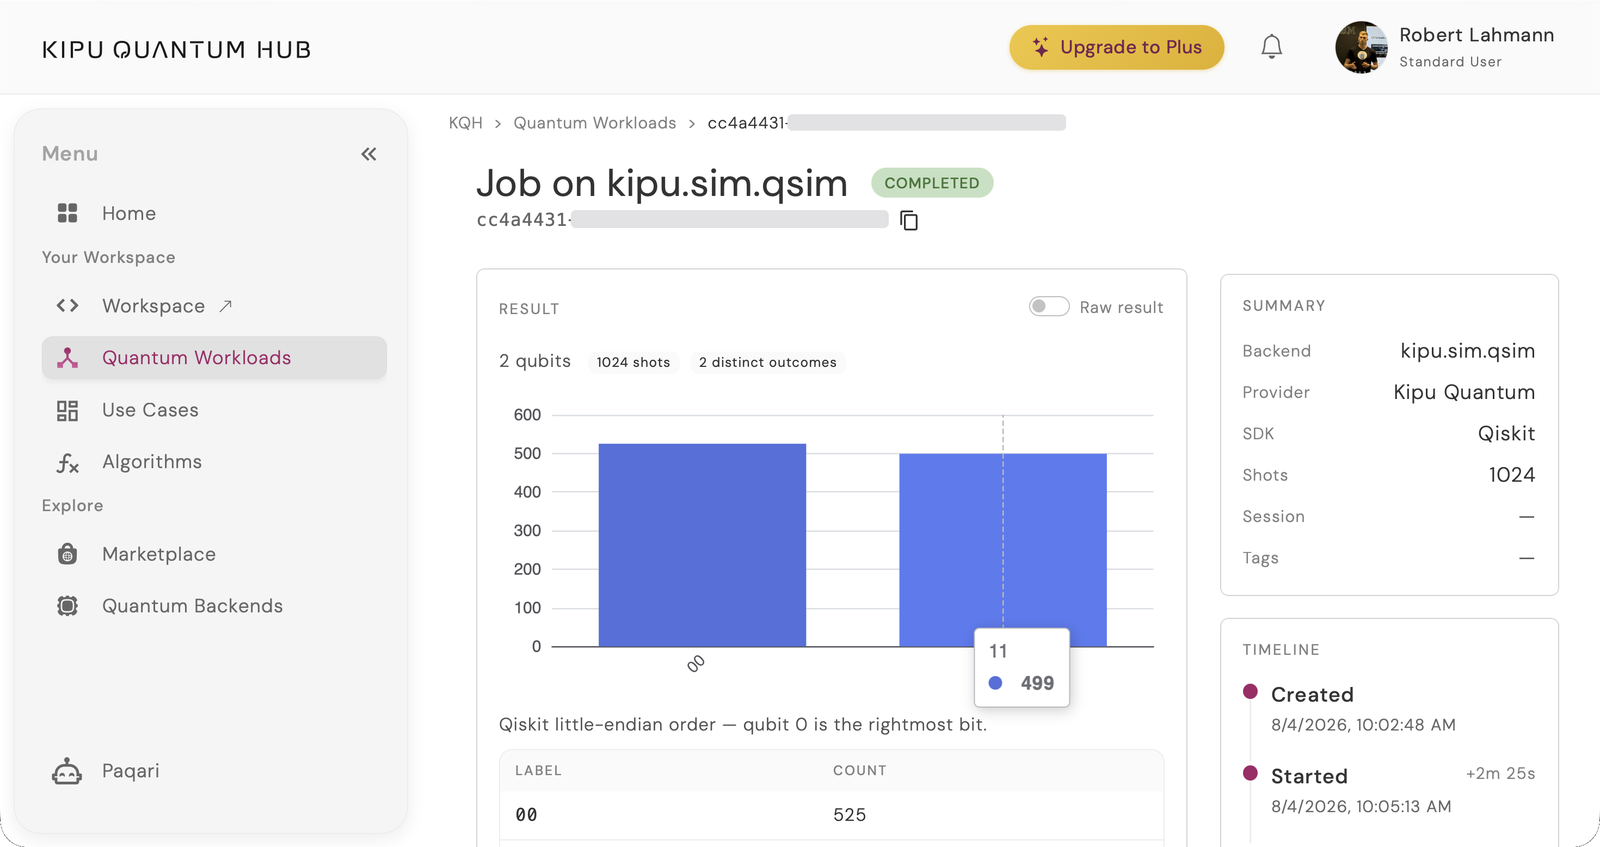
# -> {'00': 525, '11': 499}
#    Your specific counts will likely differ. Both states should be measured at roughly the same probability.
result.get_counts() returns the experiment results.
Sometimes the transpiled and original circuits differ from each other. You can monitor them with transpiled.draw() and circuit.draw(). In this case, the circuit is already in its most efficient form.
4b. Did it work?
It worked if only two outcomes appear, 00 and 11, splitting the shots roughly evenly, with 01 and 10 absent or negligible. Every shot, both coins agree. That agreement is the thing two classical coins cannot do.
In the two charts below, only the right one is measured: it is the entangled run on kipu.sim.qsim, 525 shots on 00 and 499 on 11 out of 1024, recorded on 4 August 2026. The left chart is drawn to illustrate independent coins and was never run. Your own two integers will differ, and it is which outcomes appear, plus their rough proportion, that decides whether the circuit worked.
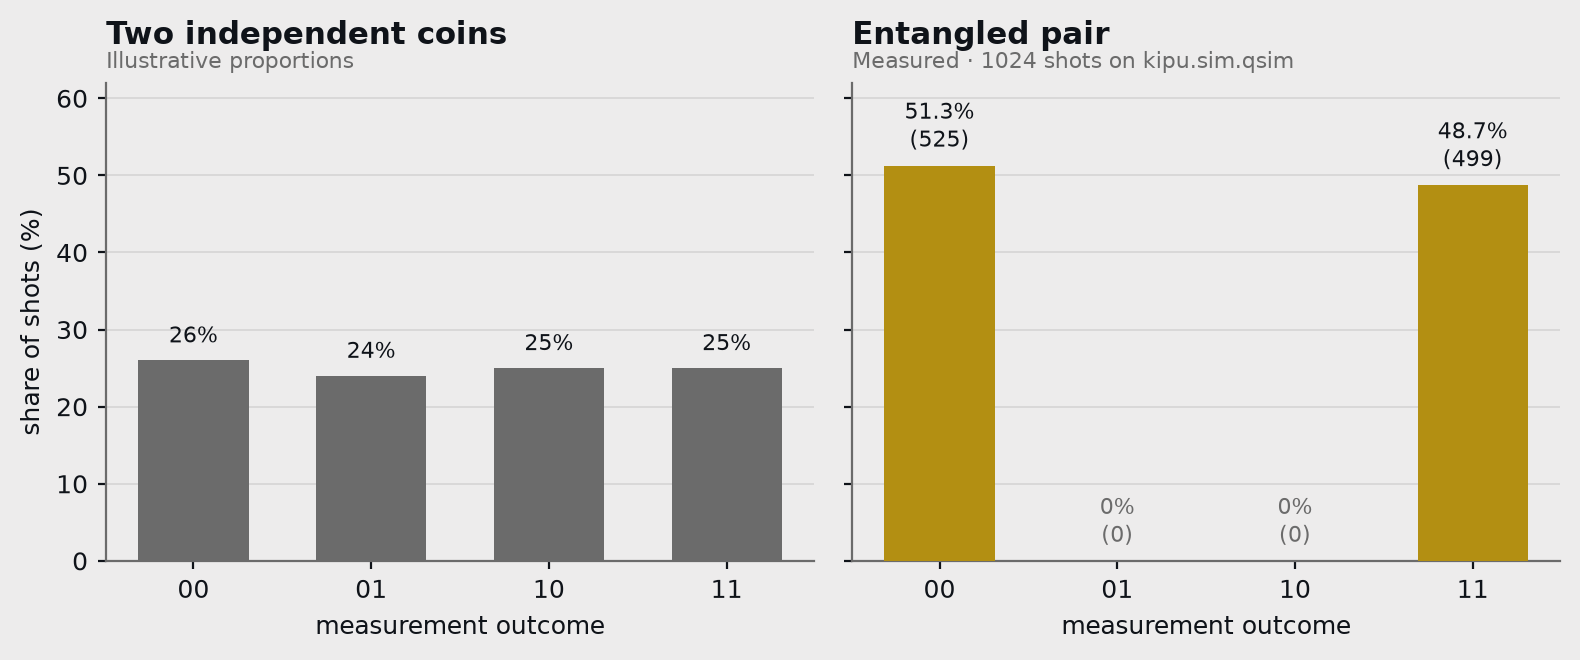
Now go back to your Step 3b prediction and check it. If it matched, think about what you now think the cx gate does.
Check your answer
00 and 11 survive, at roughly half each. 01 and 10 vanish.
Half the shots the control reads 0, the target is left alone, and you get 00. Half the shots the control reads 1, the target flips, and you get 11. Neither qubit has a determined value before measurement; what is determined is that they will match.
By measuring one qubit, you know the other. The randomness is still there, all of it, but it is now shared instead of independent.
Step 5: Fixing an error message
Error messages are documentation, and the good ones are better than the docs. This step is designed to exercise a troubleshooting session, with a real error.
The backend you will aim at is ibm.qpu.fez, a 156-qubit IBM device, the count its own configuration reported when this step was last run on 4 August 2026. Resolving a handle to it costs nothing, because nothing is submitted; the billing starts at submission, which this step never reaches.
5a. Trigger it
Connect to an IBM QPU through the provider you have been using all along. Save this as task5_error.py and run it.
# task5_error.py, first version. Expected to raise an error.
from qhub.quantum.sdk import HubQiskitProvider

provider = HubQiskitProvider()
provider.get_backend('ibm.qpu.fez')
Read the traceback. It does not merely tell you that you are wrong. It prints a labelled migration guide, with the replacement lines written out.
5b. Repair it
Task 5. Get a working handle on ibm.qpu.fez and print its name.
- Use what the traceback and the documentation tell you.
- Do not submit anything to it.
- Keep the file at
task5_error.py.
Hint 1, where to look
Read the traceback body, not just its first line. The replacement lines sit below the sentence that says what went wrong.
Hint 2, the shape of the answer
IBM backends speak IBM's own runtime protocol rather than the Hub's native one, so the provider you have been using cannot reach them. The sibling entry point in qhub.quantum.sdk is constructed the same way, with the same credential. backend.name holds the string.
Solution
# task5_error.py, repaired.
from qhub.quantum.sdk import HubQiskitRuntimeService

service = HubQiskitRuntimeService()
backend = service.backend('ibm.qpu.fez')
print(backend.name)

# -> ibm.qpu.fez
# Nothing below this line. IBM hardware bills.
That is a live handle on the machine, repaired by reading the error message.
The exception you triggered was BackendNotSupportedError. It reveals both the class and the method scoped to your exact wrong call and gave you the replacement lines with a migration guide.
Everything needed to repair the call was in the traceback, below its first line.
Step 6: Find your job
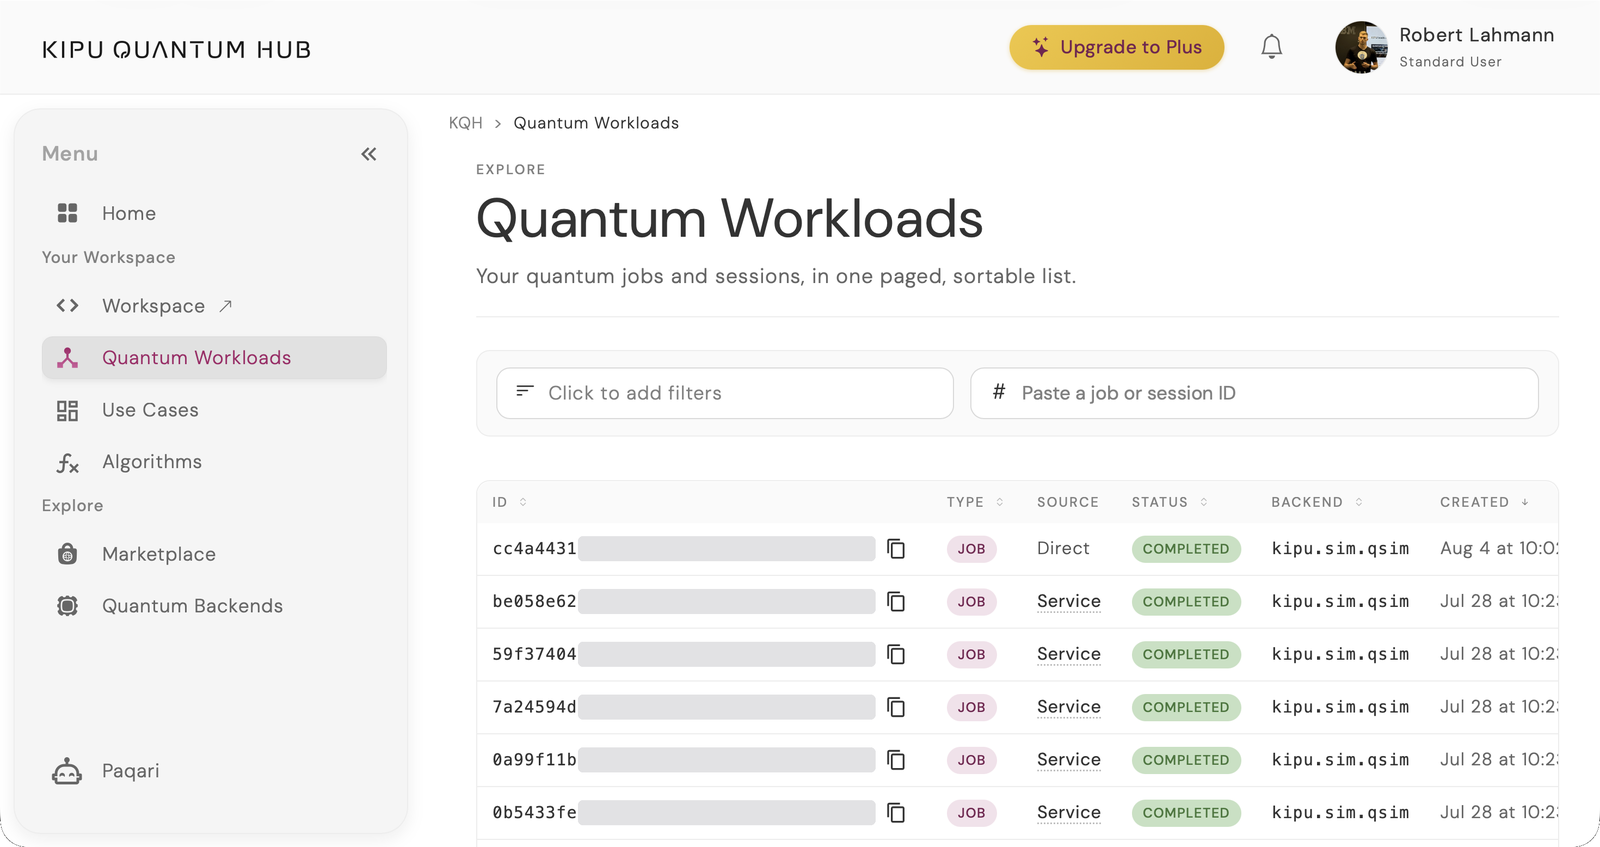
Jobs outlive your process. You can see all your submissions under Quantum Workloads on the Quantum Hub. To find a specific one, filter by Job ID. From the SDK, one call returns a single unsorted page of up to 50 jobs, so a long history needs sorting before it reads as a history.
6a. From the SDK
Task 6. List your quantum jobs and find the one from Step 4.
- Print id, status, backend and shot count for each.
- Use
HubQiskitProviderandprovider.jobs(). - Write it as
task6_jobs.py.
Hint 1, where to look
The provider has one no-argument method for this: Managing quantum jobs. Listing entries differ from what backend.run() returned, so print one entry's fields first.
Solution
# task6_jobs.py
from qhub.quantum.sdk import HubQiskitProvider

provider = HubQiskitProvider()
jobs = provider.jobs()

# jobs() returns one unsorted page of up to 50 jobs; order it newest first
jobs.sort(key=lambda j: j.created_at or '', reverse=True)

print(f'Recent Jobs: {len(jobs)}.')
for j in jobs[:5]:
    print(f'  {j.id}  {str(j.status):<12} {str(j.backend_id):<24} shots={j.shots}')
Getting your jobs from Kipu Quantum Hub, this may take a few seconds...
Recent Jobs: 50.
  XXXXXXXX-XXXX-XXXX-XXXX-XXXXXXXXXXXX  COMPLETED    kipu.sim.qsim            shots=1024
# -> your ids, count and history will differ.
6b. From the dashboard
Open the quantum workloads and find the job id from Step 4. You can Retrieve Inputs & Results and even Cancel Jobs from the interface.
In addition to the Web-UI, you can retrieve results of previous jobs using the Job ID and the HubQuantumClient (constructed with an api_key argument): Job Retrieval Reference.
Step 7: Kipu's Quantum Hub four layers
So far, you have been working in the bottom two layers of the four-layer Quantum Hub.
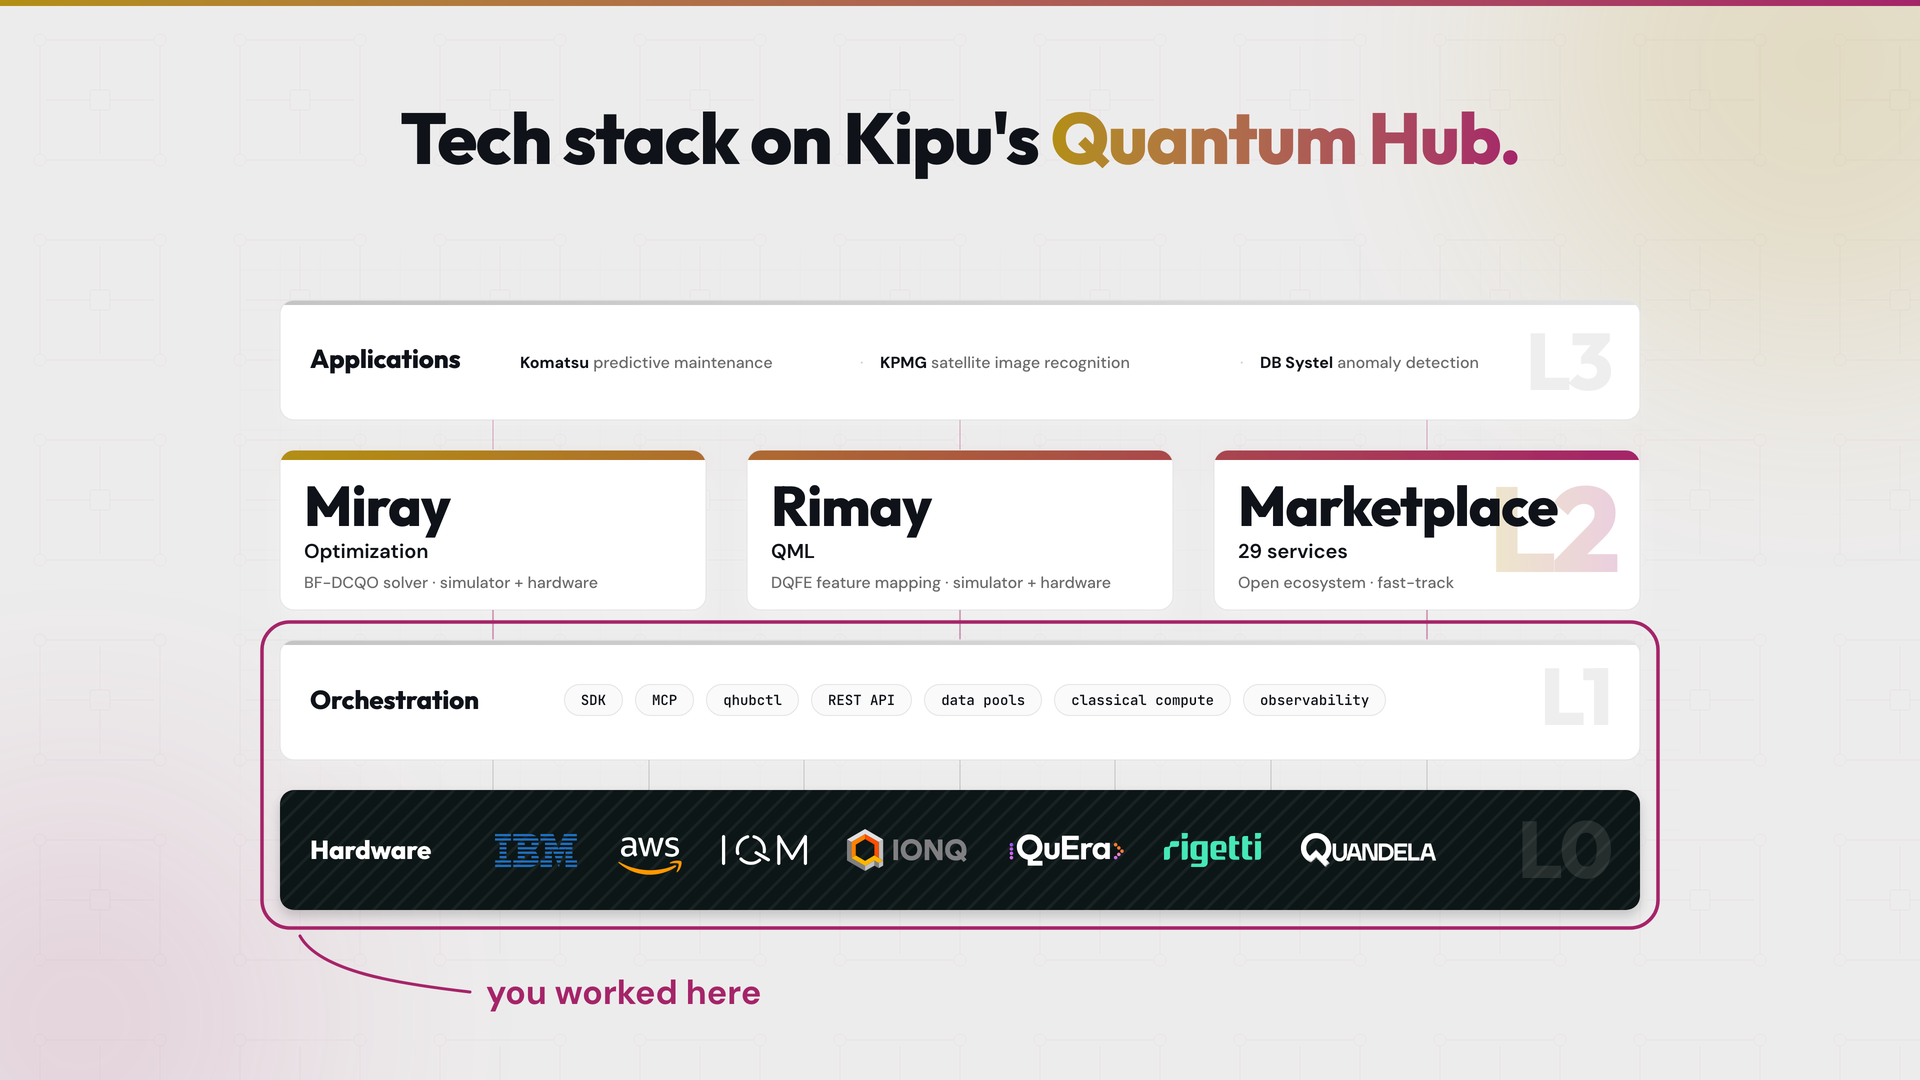
Read bottom up. You have already worked in two of them.
L0 Hardware. QPUs and simulators from several vendors. You worked with it in Step 2 and submitted to it in Step 4.
L1 Orchestration. Everything that carries a workload down to L0 and results back up: the SDK, the MCP server, qhubctl, the REST API, data pools, classical compute, observability. HubQiskitProvider is L1. Steps 1, 4, 5 and 6 were all L1 work.
L2 Services. Kipu's own algorithms, plus an open marketplace around them. Miray solves combinatorial optimization problems, running the BF-DCQO engine (arXiv:2405.13898), on simulator and hardware. Rimay does quantum machine learning by digitized quantum feature extraction, DQFE, on simulator and hardware.
Each shows a price label of Free, On Request or Commercial. On the marketplace listings, rechecked on 22 August 2026, Miray Advanced Quantum Optimizer - Simulator, Rimay - Quantum Feature Extraction - Simulator and Illay Base Quantum Optimizer all carry Free, so you can test a workflow on them without being billed on top of your license. On the free Miray simulator the limit is size rather than money: its listing states a ceiling of 20 variables, which is prototyping scale. Later tutorials use these services to teach how services work.
L3 Applications. Actual products and demos you would ship to a customer. Listed as marketplace use cases on the Hub: Komatsu predictive maintenance, KPMG satellite image recognition, DB Systel anomaly detection in network traffic. Browse the Marketplace use cases for more examples.
Optional, wire up the MCP server
L1 also exposes the Hub to AI coding agents over MCP. It is a remote HTTP server, so there is nothing to install. Check the MCP Server Reference for more details.
The server authenticates via OAuth. The first time your AI client connects, it opens a browser window where you log in to the Kipu Quantum Hub and authorize access. No tokens or credentials are stored in your config files.
Further exploration
Think about one candidate application from your own work. A real problem, in one sentence. At which layer would you build it?
- L3: there might be a L2 service you could build it on.
- L2: or lower, think about what is missing from the marketplace today.
- L1: you are building infrastructure, and we would like to offer you a job.
- L0: you are building hardware, and we would like to partner with you.
Business aside, we hope you enjoy building with the Kipu Hub. The team is super receptive to feedback. Please reach out and let us figure out a solution for your (quantum-centric) ideas.
Documentation: Kipu Quantum Hub | Hub docs | Quickstart | Quantum SDK reference | Access tokens | Managing quantum jobs | CLI reference | MCP server setup | Backends catalogue | Dashboard